
こんにちは、DXCEL WAVEの運営者(@dxcelwave)です!
- Google Analytics Reporting APIの申請方法・活用手順が知りたい
- Python環境でReporting APIを活用する方法が知りたい
Google Analytics Reporting APIとは
Google Analytics Reporting APIとは、Google Analyticsのデータを取得し、カスタムレポートを作成するためのAPIです。
このAPIを使用すると、Google Analyticsのデータの自動取得や、自身のWebサイトやアプリのトラフィック、コンバージョン、ユーザー行動の分析ができます。また、Google Analyticsのデータを他のアプリケーションやサービスに統合することも可能です。
Google Analytics Reporting APIは、開発者やWebマーケティング担当者など、データ分析に興味があるすべての人にとって有用なツールと言えます。
Google Analytics Reporting APIを活用する方法
本記事では、Googleが提供するGoogle Analytics Reporting APIの活用手順について解説します。また、Reporting APIをPython環境で実行する方法も併せて紹介します。
はじめに、Reporting APIを利用するための申請手順を解説します。最終的にPython環境で利用するには、以下3つを対応しておく必要があります。
- Google Analytics Reporting APIの有効化
- サービスアカウントを作成し、API認証に必要なキー(秘密鍵)を発行
- Google AnalyticsのビューIDの取得
それぞれ手順に沿って対応していきましょう!
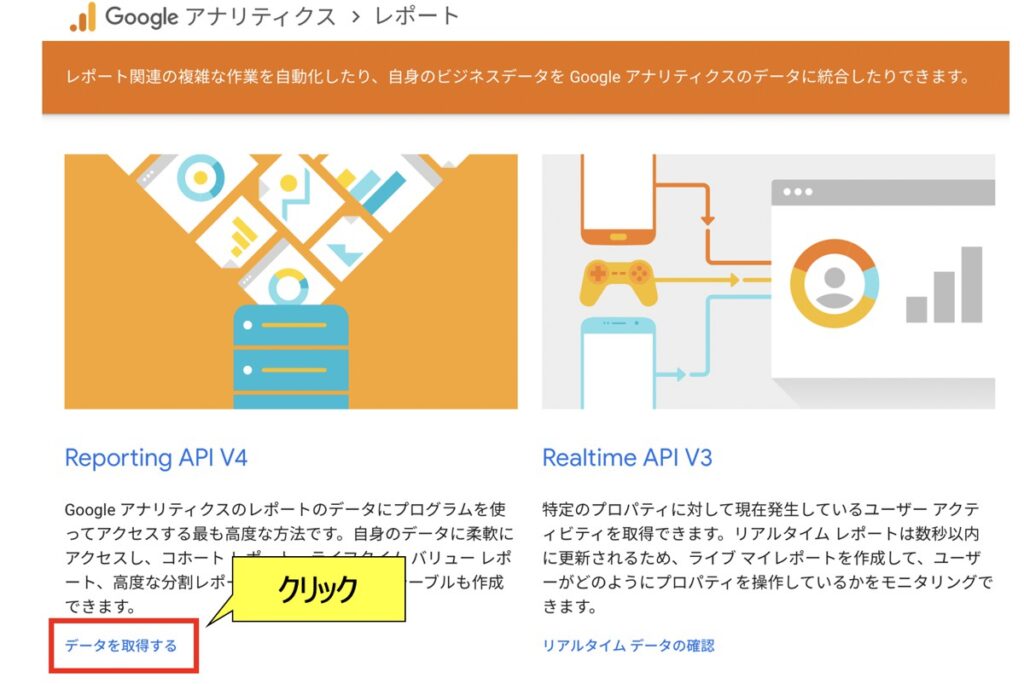
① Google Analytcs レポートページを開く
② Reporting API ページにて言語を選択
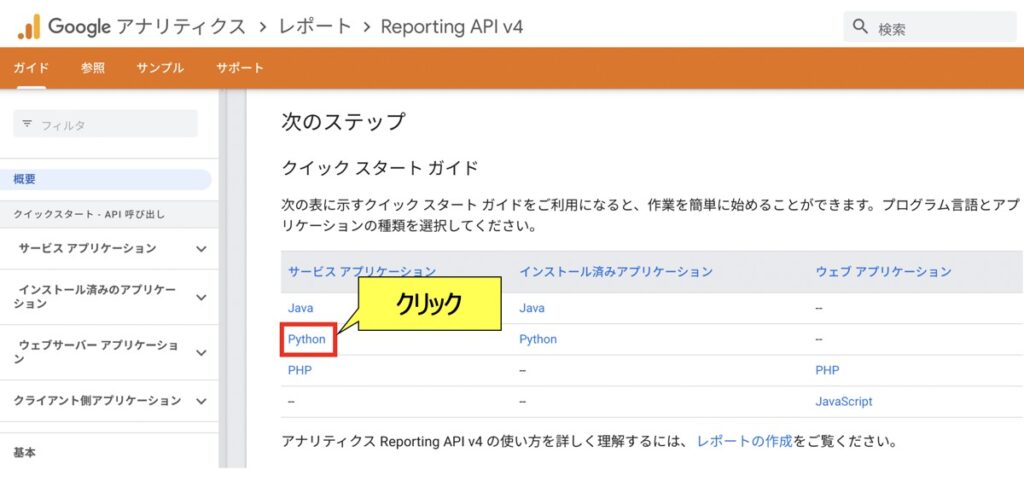
ページ中部のサービスアプリケーションにて言語「Python」を選択します。
③ Reporting API クイックスタートガイドを確認

PythonでGoogle Reporting APIを活用するガイドが確認できます。
後述ではこちらに記載の内容を1つずつ対応していきます。
④ サービスアカウントページにて「プロジェクト」を作成

Google Cloud サービスアカウントページにて、Google Reporting APIを活用するプロジェクトの作成が必要です。プロジェクト作成が未済の場合、上右画面の「プロジェクトを作成」をクリックしましょう。
⑤ Reporting APIを有効化する

⑥ プロジェクト詳細ページから「キー」を発行
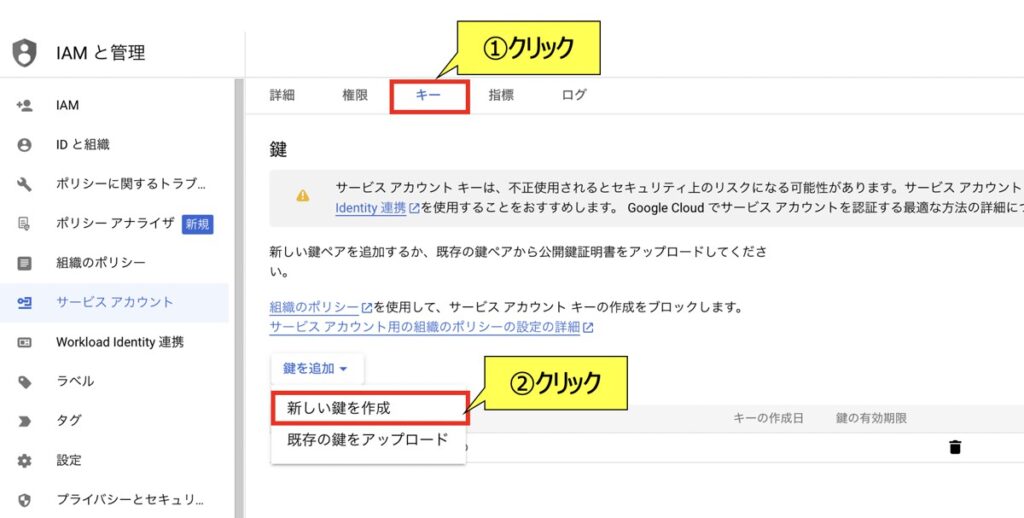
Reporting APIをPythonから呼び出す場合、秘密鍵を利用します。
秘密鍵はプロジェクト詳細ページの「キー」から発行が可能です。「新しい鍵を作成」をクリックすると、キー情報が記載されたjsonファイルが保存されます。
⑦ ビューIDの取得
最後に、ビュー IDをAccount Explorerから取得しましょう。
Google Reporting API利用に伴うPython環境構築
PythonをもとにReporting APIを呼び出す場合、専用のライブラリのインストールも必要です。
pipコマンドを用いて以下をインストールしておきましょう。
pip install --upgrade google-api-python-clientpip install --upgrade google-api-python-clientpip install pandas【Python実践】Google Reporting APIを用いてレポート作成
それでは実際にPythonコードを用いてGoogle Reporting APIを活用していきます。ベースとなる以下のコードを事前に実行しておきましょう。
この時、KEY_FILE_LOCATIONは前述で取得したjsonファイルのファイルパスを指定します。VIEW_IDはGoogle Exploler画面で取得したビューIDを指定しましょう。
import pandas as pd
from oauth2client.service_account import ServiceAccountCredentials
from apiclient.discovery import build
from googleapiclient.errors import HttpError


# 認証情報
SCOPES            = ['https://www.googleapis.com/auth/analytics.readonly']
KEY_FILE_LOCATION = 'XXXXXX.json'
VIEW_ID           = 'XXXXXXXXXXX'

# =============================================================
# Google Analytics Reporting APIの初期設定
# =============================================================

def initialize_analyticsreporting():
    # 認証情報
    credentials = ServiceAccountCredentials.from_json_keyfile_name(KEY_FILE_LOCATION, SCOPES)
    # オブジェクト生成
    analytics = build('analyticsreporting', 'v4', credentials=credentials)

    return analytics


# =============================================================
# Google Analytics Reporting APIの呼出
# =============================================================

def get_report(startDate, endDate, Metrics, Dimension):

    # リスト
    Metrics_List    = []
    Dimension_List = []

    # オブジェクト
    analytics = initialize_analyticsreporting()

    # リクエスト作成
    request = {
        'viewId': VIEW_ID,
        'dateRanges': [{'startDate': startDate, 'endDate': endDate}],       # 分析期間
        'metrics': [{'expression': Metrics[0]}],                            # メトリクス
        'dimensions': [{'name': Dimension[0]}],                             # ディメンション
        'orderBys': [{'fieldName': Metrics[0], 'sortOrder': 'DESCENDING'}]  # 並び順
              }


    # API呼出&データ取得
    try:
        response = analytics.reports().batchGet(body={'reportRequests': [request]}).execute()

        # データを1つずつ格納
        for report in response.get('reports', []):
            for row in report.get('data', {}).get('rows', []):
                Metrics_List.append(row.get('metrics', [])[0].get('values', [])[0])
                Dimension_List.append(row.get('dimensions', [])[0])

    except HttpError as error:
        print('Analytics Reporting APIエラー: {}'.format(error))

    # データ出力
    df = pd.DataFrame({Dimension[1]: Dimension_List, Metrics[1]: Metrics_List})

    return df
上記のコードをもとに、様々なレポートを出力する方法を後述します。
【Report①】ページタイトル × 訪問者数 × 直近1ヶ月
直近1ヶ月間の訪問者数をページ別に出力したい場合、次のコードを実行します。尚、DimensionとMetricsに指定可能な値はGoogle Dimensions Metrics Explorer画面で確認できます。
コード
startDate = '30daysAgo'
endDate   = 'today'
Metrics   = ['ga:users'     , 'ユーザー数']
Dimension = ['ga:pageTitle' , 'ページタイトル']

report = get_report(startDate, endDate, Metrics, Dimension)
出力イメージ
# 出力
print(report)

# 出力イメージ
#          ページタイトル      ユーザー数
# 0    【Python】ページA         9999
# 1    【Python】ページB         8888
# 2    【Python】ページC         7777
【Report②】ユーザー年齢 × セッション数 × 直近1週間
直近7日間のセッション数をユーザー年齢別に出力したい場合、次のコードを実行します。
コード
startDate = '7daysAgo'
endDate   = 'today'
Metrics   = ['ga:sessions'       , 'セッション数']
Dimension = ['ga:userAgeBracket' , 'ユーザー年齢']

report = get_report(startDate, endDate, Metrics, Dimension)
出力イメージ
# 出力
print(report)

# 出力イメージ
#   ユーザー年齢    セッション数
# 0     25-34        600000
# 1     18-24        500000
# 2     35-44        400000
# 3     45-54        300000
# 4     55-64        200000
# 5       65+        100000
【Report③】ブラウザ × セッション数 × 直近3ヶ月
直近3ヶ月間のセッション数をブラウザ別に出力したい場合、次のコードを実行します。
コード
startDate = '90daysAgo'
endDate   = 'today'
Metrics   = ['ga:sessions' , 'セッション数']
Dimension = ['ga:browser'  , 'ブラウザ']

report = get_report(startDate, endDate, Metrics, Dimension)
出力イメージ
# 出力
print(report)

# 出力イメージ
#               ブラウザ   セッション数
# 0              Chrome       8000
# 1              Safari       7000
# 2                Edge       6000
# 3             Firefox       5000
# 4     Safari (in-app)       4000
# 5     Android Webview       3000
【Report④】チャネル × ユーザー数 × 90日前〜30日前
過去90日〜30日前における訪問者数をチャネル別に出力したい場合、次のコードを実行します。
コード
startDate = '90daysAgo'
endDate   = '30daysAgo'
Metrics   = ['ga:users'            , 'ユーザー数']
Dimension = ['ga:channelGrouping'  , 'チャネルグループ']

report = get_report(startDate, endDate, Metrics, Dimension)
出力イメージ
# 出力
print(report)

# 出力イメージ
#          チャネルグループ      ユーザー数
# 0       Organic Search         10000
# 1               Direct          9999
# 2             Referral          8888
# 3               Social          7777
# 4              (Other)          6666
【参考】Pythonを活用した様々なお役立ち情報

当サイトではPythonを活用した様々なお役立ち情報を配信しています。
Pythonでできること・仕事に応用
「Pythonで実現できることを知りたい」「Pythonスキルを仕事で活かしたい」方はこちら!
Python✖️AI・機械学習
Python活用の最大メリットの1つであるAI・機械学習について詳しく知りたい方はこちら!

Python✖️投資自動化(仮想通貨)
Pythonはフィンテックとの相性が良く、その中でも仮想通貨自動売買タスクは近年注目度の高い領域です。フィンテック・投資に興味がある方はこちら!

最後に

お問い合わせフォーム
上記課題に向けてご気軽にご相談下さい。
お問い合わせはこちら
